Wednesday, 29 December 2010

Ball gown of cherry-red silk damask

What a surprise - this time it was going to be a 21st century gown to enhance my wardrobe. The fabric being showy enough, the cut, on the contrary, is very simple.


The floor-length skirt is a three-quarters-circle with hand-sewn hem and was the product of a relaxed evening, partly in front of the tv. It is worn over an underskirt of 20 metres of white tulle worked in four layers and finished off at the hem with red bias tape. The main idea was that the skirt must get enough volume to look pretty without restricting me when dancing, like a hoopskirt probably would.

The bodice had to be fitted, strapless, give a nice shape and let me breathe - kind of a jack-of-all-trades device. The result turned out very nice - I used the pattern of a well-fitting corset to be worn over a strapless bra. The mock-up was made of rather stiff cotton and, as it fitted perfectly, was used as the middle layer of the actual bodice. It's boned at the seams and sandwiched between the outer layer of red silk and an inner layer of pale red taffeta.

Both parts are sewn together invisibly and close at the back with a zip fastener.

Monday, 6 September 2010

Green and black renaissance dress


Fair warning, this dress is not period. But it's the first historic costume I ever made, more than ten years ago, so I'm not ashamed to wear it still. I virtually sketched the draft for the bodice off my body and just went on sewing using a scrap of fabric I had found in my mum's sewing box. I daresay, considering the lack of my experience, the result turned out pretty nice.

The bodice is double-layered and stiffened only with a cardboard-triangle (as I said, lack of experience; and lack of material) that was afterwards enhanced by sewing three pieces of steel boning to the lining. In any case, the thing fits its purpose and makes a formidable bust without having to wear a corset underneath! Back fastening with two rows of eyes and black cord lacing, decoration consists of black frill around the extremely wide leckline and (added afterwards) black satin ribbons sewn to the front in the shape of a stomacher. The flounce to visually join bodice and skirt together was added afterwards.


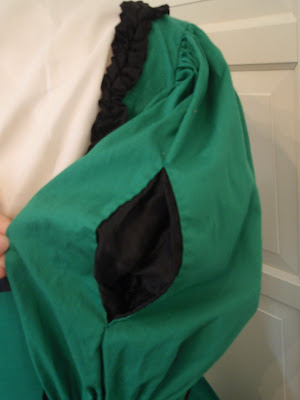
The sleeves are very thight at the forearm and elbow, just wide enough to slip in - the strip of black, ruffled fabric I set into the seam was pure improvisation when I noticed I wouldn't fit in otherwise. Looks nice, though. The upper sleeves have four slits, each backed with a sewn-on patch of black taffetta.


The skirt was actually plain black cotton, as there was nothing left of the green I had used for the bodice, but it looked weird, a green bodice and a black skirt, so I decided to improvise an overskirt. As soon as I found some fabric that halfway fitted the original green, I made the overskirt that is fastened to the waistband of the underskirt by means of hooks and eyes, decorated with black satin ribbon all around. Both, skirt and overskirt, are made of a normal length of fabric pleated into the waistband, instead of cutting the material and making a smooth, bell-shaped skirt as actually was done in renaissanc times.

Yellow baroque peasant's dress

Promised I'd post this ;) I bought the fabric accidentally (happens often, hence the crammed wardrobe, hehe!) and decided to make a simple renaissance/baroque dress that I could wear to faires or at other events instead of the medieval stuff. Medieval clothing gets boring after a few years... So, having almost finished my dress form, I took a few indoor pics, so I wouldn't have to dress, put on make up, arrange hair and whatnot. Terribly practical, having such a dummy, saves a lot of work ;)


The skirt circumfence is three metres, pleated into waistband as always, two lengths of brown ribbon at the hem. Closes behind with two eyes and a ribbon through them.

I bought the blouse, so no comment on this ;)

The bodice is based on a renaissance-dress pattern from 'Patterns for Theatrical Costumes'. Each of the four parts is cut out twice, sewn together at the seam with some allowance to join them together afterwards, then turned and the two layers fused with fusing material. The four slightly stiffened parts are then sewn together. It's important that the parts fit well already before you cut them twice and fuse them, only then you'll have a nicely fitting bodice with very clean seams. The flounce is attached, then everything decorated with ribbon. Closes with hooks and eyes.


This costume showed me that my new-and-not-even-finished-yet dummy is a little disproportionate, as the bodice fits me perfectly but is rather tight over the dummy's belly. Gotta change that...

Saturday, 28 August 2010

Taylor's dummy

Oh deeeear!! *excited squeal* I almost forgot to mention it, I'm finally making my own dress form! Actually I'm already halfway through, my sis helped me to wrap my torso in tape, following one of the many instructions on Youtube & Co. The dummy-torso is already stuffed with rolled foam (over a roll of cardboard that fits perfectly on the stand), fiberfill and pieces of newspaper - trying to stuff the dummy so it can be corsetted if necessary, means hard at the back and softer in the belly-region. I also flattened the breasts so I can use it either for corset-shapes or, with an additional, stuffed bra, for normal shape. I just have to cover the whole thing with stretch fabric and take pics. I'm always slow at taking pics, I know...

***

Ok, time for a project update. During our last collective sewing-session, I found courage and leisure enough to refine the dummy. Golden rule when letting yourself be taped: keep your shoulders *really* straight, or you'll have to correct it afterwards by applying layers of paper and tape to the dummy to give the shoulders the proper shape. At any rate now all my dresses fit the dummy perfectly, which means that I have no excuses anymore for not starting my late-rococo projects. Except that the dummy has to be covered and the neck and bottom closed with wood. I think I'll take a trip to the fabric store today and to the DIY-store tomorrow... :D

Blue rococo gown

And here we go, merrily starting yet another project although none of the previously started has been finished yet! Who cares... ;) This time, it's a rococo dress for my sister, who has thankfully been persuaded into taking part in a play - for which she will be appropriately clothed, of course. Thus I'm going to alter the already existant pattern to her measurements (Hello challenge!) to produce (hopefully finishing it on time) a gown of light blue brocade with an underskirt of pale blue cotton and the usual trimmings in white lace and blue ribbon. White petticoat and chemise have already been finished (although petticoat has to be altered slightly).

So the petticoat is three metres of white cotton, pleated into the waistband to be closed with strings at the back and adorned with two lengths of white satin ribbon at the seam. I just want to add here that usually, rococo skirts had their opening slits at the hips, thus enabling the wearer to wear pockets beneath them. It's a costume in this case, so I went for the simpler way of putting the skirts on.

The underskirt of the dress is constructed similarly, only that here you have to shape the seam according to the panniers that are worn under it. Not necessary with the petticoats, as they won't be seen, but underskirt and dress have to have a curved seam, shorter at the front and back and longer at the sides that will be pushed up a little by the panniers. Along the seam runs a ruffled strip of the same fabric, conveniently hiding that I never sew seams by hand. The ruffle should be attached by hand, though.

Wednesday, 28 July 2010

Chemise à la reine

And yet another new project... Well, actually not really. I started it months ago, then it gathered some dust while I finished a few other things, and now I have finally figured out how to do this thing without it looking too bulky. Problem was, when I started sewing the chemise, I was firmly convinced that I would have to line it. Well, you can imagine that two layers of gathered fabric - and be it just finest batiste - will inevitably cause anyone, no matter how slender, to look like a stuffed white sausage. Finally I figured that I'd be wearing petticoats beneath it anyway, so I could leave away the lining and just work with one layer of wonderfully light, sheer, fine batiste. Slow on the uptake sometimes :D Anyway. This is how it is approximately going to look like once it's finished:


I think the pic is from V&A Museum, but not quite sure, I have such a huge amount of random costume pics on my harddrive... This kind of dress became en vogue in the 1780s.

This time I tried a pattern from Norah Waugh's "The Cut of Women's Clothes". Only thing I altered was not to slit the dress completely at the front. My version is put on over the head, with a frill at the neckline and puffed sleeves. Currently attaching the sleeves and trying to remember where I put the rest of the fabric for the frill...

Tuesday, 13 July 2010

Yellow rococo dress


I actually made this dress already years ago, but remade it last year to weed out a few flaws. The ribbons of the stomacher were only sewn on, being mere decoration, the bodice did not fit perfectly and there was too much fabric at the front of the skirt and not enough at the back to make the watteau-pleats fall nicely. Now everything has been corrected, and I'm almost completely satisfied with the outcome. The ribbons are now fully functional and are tied into bowties after the dress has been put on. That's how it should actually be.


The fabric of the dress is a printed cotton, no actual pattern, just shades of yellow that make up to a nice overall colour. Unfortunately I bought only about four metres, which is not enough if you want really nice pleats at the back. But they're okay for the simple summer dress it's intended to be. The stomacher and underskirt are very lightweight cotton in a matching shade of pale yellow. And yes, it was a helluva job to find exactly the right colour! Especially as I continually kept forgetting to take a swatch with me to the fabric store... Talk about scattiness :D In the first turn, I bought the wrong yellow - which led to me making a very nice late renaissance/early baroque peasant's dress. I'll put that one online someday. Anyway... A decent rococo/Georgian dress needs plenty of decoration, for which I used white lace, yellow braid, satin flowers and an attempt of self-made flowers made from the same fabric as the dress. Lace on the dress might not be completely period, but I'm no reenactor :P


I used the pattern and instructions I found on www.marquise.de - a very recommendable site. The lining of the back joins the front sections together, so the folds at the back can fall loosely. Front parts are also lined, as are the sleeves. The stomacher should actually be stiffened with boning (plastic, steel, whatever you prefer), I have to admit that I used cardboard in the first attempt. Hey, I was a beginner back then! ;D Worked quite nicely for some time but lost its shape over time so I redid it with boning and buckram. The stomacher is attached to the dress with hooks and eyes and covered by the eschelles, the bows, which close the robe over the stomacher. I've since add some embroidery.


The engageantes, means the white, lace-trimmed flounces on the sleeves, actually should belong to the chemise beneath, but I didn't bother with that and just stitched them to the dress. They can be taken off for washing.

The underskirt is decorated with a stripe of ruffled fabric along the hem. If I had known how difficult this is to iron...

The hat was actually a round place mat. Yes, hatting can be a very creative thing! :D I shaped it by moistening the centre a little and molding the centre and back so the hat can be worn on top of a rococo hairdo. It's decorated with lace, little silk flowers (or whatever they really consist of these days...) and yellow satin ribbon.


The lining is sheer white silk, sewn to a wire frame, and the whole thing is sewn to the brim of the hat as well as to the centre (beneath the lace ruffle on top so you don't see the stitches).


What's beneath this dress is a chemise, pocket hoops, hanging pockets (I already posted that) and a corset - though the latter isn't worn in the pictures, it was the hottest day of the year, and by the way, I'm currently re-working my rococo-stays because I misinterpreted something when I sewed them years ago.

The dress is completed by a silken fichú (neckerchief; not worn in pictures due to climbing mercury column) that I simply bought so I needn't bother with doing the rolled hem myself, and a little lace cap.

Saturday, 26 June 2010

Blue striped half-robe

I really should finish several other projects before starting a new one again, but that wouldn't be me... ;) The half-robe will be worn over a round robe - which I still have to make. Uh well... Anyway, I wanted to start working with this fabric: middle-blue cotton with weaved-in dark-blue and claret stripes; it's one of those I found and immediately knew what I wanted to make from it. Still adjusting the pattern, there's an odd piece that doesn't quite fit in, but I'll figure that out :D Said pattern is, again, from "Patterns of Fashion Vol. 1." - I somehow came to like this book really well! *bg*

Thursday, 17 June 2010

Blue and white striped regency dress

I did this one already years ago - and the first comment I got was that it looks like a nightgown! Wharrgarbl... Anyway. The pattern is from Norah Waugh, "The Cut of Women's Clothes: 1600-1930". Same procedure as every time: enlarge, fit, cut out, try on, adjust, sew. I left away the fluffy flounces of the original and instead finished the edges with lace. The dress is only slightly trained and therefore thankfully survived a march through the muddy forest quite well. The original dress would have been fastened at the front, but I didn't want the skirt to be open on any side, so I changed it and now it's put on over the head, the waist is just wide enough to allow that. Nonetheless I'm going to line the bodice, the gathered fabric keeps slipping out of position at the shoulders. Nothing beats a good lining...

It was while sewing this dress that I discovered the best way to pleat the back of the skirt, namely in a way that allows you to leave away the little pad that usually kept the skirt from falling into the hollow of the back. I'll post a sketch of it as soon as I got time to draw one ;)

Regency apron


I somehow got caught in some kind of regency-faible (for lack of dress-stand to make late-rococo dress, meh!), so I decided to make a quick apron to go with my two dresses. The pattern is simple and can be found online or you can just cut the pieces yourself. I used a leftover piece of white fabric, machine-embroidered with small, unobtrusive flowers, visible seams are sewn by hand (I just had that fancy when I started). Closes at the back with little mother-of-pearl buttons. And yes, I should have ironed the apron for the pictures...


Green-golden renaissance dress


Another historic ball upcoming, and of course I needed a new dress - actually already in June. Well, as so many things in my life, it was begun early and finished very late, namely the following year :D I've had the fabric in my wardrobe for years, waiting for inspiration, and I found it in another pattern from one of Arnold's books and in a dress I found online. The fabric is a pale green with golden threads, looks lovely even in candlelight!


The skirt is trained this time (great thing for washing...), and again it was amazing how many gentlemen liked the train so much they stepped on it :D It's the usual skirt pattern, folded neatly into a lined waistband so the stiffer lining fabric helps to hold 4 1/2 metres of brocade. The train is about one foot long, which makes it long enough to look good and short enough to handle it even when dancing. The skirt should be worn over a slightly oval hoopskirt but I had to improvise (due to lack of time again) and wore it over a round hoopskirt with bum pad and a definitely non-period tulle underskirt. Anyway, who would dare peep under a lady's skirts! ;D

The bodice is the same pattern I used for the green-black renaissance dress (drafted it when I was fifteen, sheer beginner's luck!), with two layers of boned lining and a top layer of brocade. It's laced at the back. Just the front is boned to give the bust the flat shape typical for the renaissance period, and two pieces stiffen the closing at the back.

The sleeves can be taken off, as there are two pairs of sleeves to be worn with the dress. One consists of ten strips of brocade sewn into tubes and ironed flat, joined at the wrist and at the shoulder and decorated with pearls (or gold ornaments? let's see...) in between. With these sleeves, the dress is worn over a renaissance chemise. The second pair of sleeves (still to be sewn) will be puffy at the shoulders and tight along the rest of the arm, to be made from the scraps of fabric that were left when cutting the trim pieces for sleeves #1.

Sunday, 18 April 2010

Musketeer outfit

...or how to clothe a baroque gentleman properly if you have to work quickly and on a budget. I really love planning other people's costumes, but how come I never seem to have enough time to actually finish them?! Again, pattern from "Patterns for Theatrical Costumes". Let's see how this one turns out.


Unfortunately my camera refused to depict the exact colour of the fabric. The brocade for the doublet is a rich golden colour, the linen for the trousers a warm, dark brown with a tinge of gold to it.

Well, the first thing to begin with are always the boots, right? No? Anyway... As there's no time to go for real boots, I decided to make fake ones, means boot-legs that are worn over over normal shoes (in this case 18th century low shoes that fit nicely). A double layer of fake suede (the slightly stiffened version) works quite well, the top is adorned with a row of lace that's stitched invisibly to the inside layer. The instep where bootleg and actual shoe meet is covered by this butterfly-shaped leather thingy that's so typical for this kind of boots, and a stirrup in a matching colour keeps the whole thing in place. The work of one evening, and it's done very neatly.

Next step are the trousers, loose breeches in this case that end shortly below the knee, just above where the boots start (so it's actually a good thing to have the boots finished when you make the breeches). The hem is usually decorated with one or two rows of matching ribbon loops, the sides can remain plain or, as in this case, be decorated with braid.

Following the gaze upwards, naturally the next thing to sew is a shirt with a large, lace-framed collar and lace cuffs. The basic pattern of a baroque shirt is a rectangle with sleeve-rectangles attached and gathered into cuffs, the neck opening with slit lined with the collar that can be closed either with a button or, better, with two strings that end in a tassle. If you got too much time, you can embroider the shirt. I didn't have that time... :P

A doublet goes over the shirt, as a man just in his shirtsleeves was considered practically naked. The eight parts of the pattern are each lined individually and then sewn together. The long sleeves are slit, so the shirtsleeves of fine, white linen are visible. The striped pattern of the fabric I used just begged to be used for a zig-zag-pattern, which gives the costume additional decoration. Nonetheless (it's baroque, after all - they used tonnes of decoration unless they were puritans!) the parts are edged with matching braid and close at the front by means of tarnished brass buttons.

And the hat. Well, to my disappointment I discovered that what I bought is synthetic felt (I wanted real one, but try to get real felt by the metre...), which refuses to be molded in shape with a steam iron, so I had to change my plan and sew the hat - which usually is only done if it's a leather hat, I think, but anyway... The crown consists of two layers fused with an iron-on interfacing and is sewn to the brim (which also consists of two layers with still more interfacing between - just add enough to make it nice and stiff) and rimmed with wire. I zig-zagged it to the edge, but be careful, needles break easily if they hit the wire :P


The wire and zig-zag-stitch are covered by a length of ribbon in a matching colour (in this case the same as the hatband). The whole procedure makes it easier to get the brim in proper shape. I also added a sweatband on the inside and decorated the hat with a hatband and plumes. Et voilá, I've found a new hobby (again) :D


Add gloves and insert a handsome guy, and you got a perfect musketeer! ;)

Red early-baroque dress


I'm incorrigible - yet another dress started while the previous ones aren't even finished! But time is pressing again, I need it for a play this time. Musketeer-setting, and that practically forces me to enrich my wardrobe by yet another dress. Baroque was still missing in my collection anyway :)


Main ingredient is rather thin, cherry-red cotton fabric, lined with slightly stronger red cotton. Red satin ribbon for the decoration, white cotton and white lace for the collar and the shirtcuffs. The white satin ribbon I used around the edge of the bodice is missing in this picture.

The pattern is from Holkeboer's "Patterns for Theatrical Costumes", the dress consists of a high-waisted bodice with large, lace-framed collar and a simple skirt.

The six parts of the bodice are lined individually and are then sewn together. The stomacher, stiffened by whatever you consider fit (if you use cardboard, make sure to add two or three pieces of steel boning at the back for additional stability), is attached to the bodice with hooks and eyes. Here's a detail of the front, already decorated with little wax pearls.


I stiffened the stomacher with two layers of stiff fusing material, one layer of double-sided fusing material and sandwiched invisibly in between three lengths of plastic boning, one centered, one on either side. The full sleeves end at the middle of the forearm, and of course also here we find the large lace collar and cuffs. White satin ribbon is sewn along the edge, and the front is decorated with little bowties, made from broad satin ribbon with a piece of narrow ribbon sewn round the center.


The skirt is self-explanatory, skirt with slit at the back, floor-length, maybe even a little longer (baroque opulence liked overlong dresses at the beginning of 17th century). It's worn without a farthingale, just with a few petticoats (or, in case of the pic, a very moderate hoopskirt). Here's a detail of the fastening:

Monday, 15 March 2010

Green regency drop-front dress


After some inspiration I sat down to make a quick regency dress from some material that had already been waiting for me to get motivated again. The inspiration was actually 1860s stuff, but regency was first in line on my to-do-list :) Again the pattern is from Janet Arnold's "Patterns of Fashion Vol. 1".


The fabric looks quite plain, still the more as the photo turned the green into some kind of pale mud-brown. Actually it's a tiny woven pattern of white and linden green which looks very nice once it's made into a dress.

I still don't know exactly how I managed to fit the pattern to my body, but somehow it worked even without a dress stand - thankfully! 1 1/2 days of sewing and an equal amount of time for the finishing touches, and now it's almost perfect (not completely satisfied with the sleeves, but anyway...). I didn't expect so much hand-sewing for the details of the bodice to be necessary, but it really paid off. Very clever pattern, the bodice gives a wonderful push-up effect and hence makes a very nice silhouette, and the dress itself does not only look good but also wears very well.


The front flap has three rows of tucks that I sewed with the sewing machine and afterwards overstitched them by hand. Thus the seams are very strong but still look period. The flap closes with hooks and eyes that are hidden by little mother-of-pearl buttons.


Beneath the flap is the gown's secret, the built-in push-up lining that closes with two hooks and eyes beneath the bust and over it with four buttons.


Thursday, 21 January 2010

Blue and white striped rococo dress (upcoming)


As stated in the picture, the pattern dates from the end of the 18th century and can be found in "Patterns of Fashion Vol. 1 1660-1860 - Englishwomen's Dresses and their Construction" by Janet Arnold, ISBN 978-0896760264 (warmly recommended). So far I have the fabric at home and am currently fitting the pattern to my measurements. All the patterns from this book can easily be enlarged by 800% using a photocopier (which saves shitloads of time!) and then just need to be adjusted to your body (test piece from cheap cotton fabric necessary).

Well yeah, so far, so good. This is the fabric:


And as to the rest, I have just discovered that it's useless to start this project without a decent dressform. So, postponed again. At least that gives me time to re-work the corset and sew a bustle pad to give the dress the right shape. Renaissance bumroll wouldn't work well here...

Hanging pockets for rococo-dress


Voilá, finally finished! And I have already used my pockets and found them very practical. From now on I'll have to remember to make pocket slits into all my new skirts.


I know, I know - at this stage, the pieces still look like pot cloths :D The three pieces to the front are the layers the two sides of the pockets consist of: striped fabric for the outside, light wadding and white fabric for the inside. And no, the wadding is not period. The back row in the picture shows (left to right) the three stages from sewn, half quilted (diamond pattern) to fully quilted, the leftmost piece also shows part of the back.

The pockets were often embroidered with floral patterns. I designed a rather simple one (and afterwards decided to change the center rose for a butterfly, which fits the style better):


The three layers are sewn together around the edges by means of simple zigzag stitch. Won't be seen in the end. I quilted them in a diamond pattern to keep the layers closely together, then used carbon tissue to apply the pattern for the embroidery. Make sure it's centered. For the embroidery, I chose multi-coloured thread in various shades of blue. After the embroidering was done, the back of the pocket was lined with another layer of light cotton to hide the ends of the blue thread.


Both pockets were then finished with matching blue bias tape.

Tuesday, 19 January 2010

Huntress (beta-version)

© Fotostyler
Okay - except for the leather-strap bra, this costume was the quick product of one day, hence the addendum 'beta-version'. I'm going to perfectionate it, especially the leggings (will be made from leather, lined with fleece) and the loincloth.

The bra-design is based loosely on "King Arthur" (remember Guinevere fighting?), but I used medium suede to cut the straps from, instead of braiding leather strings until the outcome is broad enough. Time was pressing. Two straps run round the chest, one close beneath the bust, the other one right across it to press it flat and upwards. This is a constant battle between aesthetics and physics and only works up to cup C, if you ask me. At the crossings, the straps are joined with leather strings, and the whole thing is closed by means of two strings under one arm.

Loincloth and leggings are based on Native American patterns, but adapted to avoid their getting out of place. The loincloth consists of a long strip of sand-coloured cotton fabric, the edges slightly frayed (don't cut the cloth, rip it, this gets the desired effect) that is long enough to hang down about an ell behind and at the front AND pass through between your legs. It's covered by a layer of fleece (only added for warmth, can be left aside) that does not hang down, front and back are then decorated with a piece of fur. All this is stitched onto a soft fabric belt that ties on one hip and keeps everything safely in place.

.....currently no time for the rest, will keep it coming though! ;)

Monday, 18 January 2010

Eowyn's blue and brown dress (aka Refugee Outfit) from LotR

© Fotostyler
I could not resist attempting to copy this costume as closely as possible when, by pure chance, I stumbled upon (almost) exactly the right fabrics! It's not an exact copy nevertheless, but who cares, as I don't do cosplay ;P

Pictures of the original can be found here, the detailed description I discovered here. Both are very valuable pages for costume research.

For the underdress, I used my 6-parts-plus-sleeves pattern. I left the straight-cut sleeves unlined (the original version has lined sleeves) and embroidered them with pale golden thread in very simple lines. For the neckline, I embroidered a separate piece of the same fabric and, for lack of detailed knowledge as to the exact pattern, sewed the lower end flat to the dress, about a span from the neckline, and gathered the upper end to the neckline to join both layers into the neckband. Neckband is sewn flat with invisible stitches and decorated with larger, diagonal stitches with golden thread.

The overdress consists of three parts - two for the back to follow the curve of the backline, one for the front -, which I designed myself. As the dress should fit closely, you should pin the pieces together and try it on before you trim the edges of the side openings. The side openings as well as the neckline are just folded back and sewn down with invisible stitches - this only works if the fabric, relatively coarse linen in my case, can be stretched to lie flat and not crease around corners. The hem is frayed out for about four centimetres and there secured with zigzag stitch. For the side-lacing I used off-white cord (original is golden).

Saturday, 2 January 2010

Literature

There's a lot of books about historic clothing, historic patterns, style and whatever. The following list is but a tiny selection of useful literature - further book recommendations that I can add here are very much appreciated! :)

For your convenience (and to pimp my blog a little) I have now included direct links to Amazon which is where you should get most of the books. As for the currently out-of-print books, try to borrow them from a bigger library (e.g. university libraries) or have a look at www.zvab.com, the biggest online exchange for used and rare books.

"Seventeenth-century Women's Dress Patterns: Book One" by Jenny Tiramani et al., ISBN 1851776311
Seventeenth-Century Women's Dress Patterns, Book 1 (Womens Dress Patterns 1)

"Seventeenth-century Women's Dress Patterns: Book Two" by Jenny Tiramani et al., ISBN 1851776850
 Seventeenth-century Women's Dress Patterns: Book Two (Dress Pattern 2)

"The Cut of Women's Clothes: 1600-1930" by Norah Waugh, ISBN 978-0878300266
The Cut of Women's Clothes

"The Cut of Men's Clothes: 1600-1900" by Norah Waugh, ISBN 978-0878300259

The Cut of Men's Clothes: 1600-1900

"Period Costume for Stage & Screen: Patterns for Women's Dress, Medieval-1500" by Jean Hunnisett, ISBN 978-0887346538

Period Costume for Stage & Screen: Patterns for Women's Dress, Medieval-1500

"Period Costume for Stage & Screen: Patterns for Women's Dress, 1500-1800"
by Jean Hunnisett, ISBN 978-0887346101
Period Costume for Stage & Screen: Patterns for Women's Dress 1500-1800

"Period Costume for Stage & Screen: Patterns for Women's Dress, 1800-1909" by Jean Hunnisett, ISBN 978-0887346095
Period Costume for Stage & Screen: Patterns for Women's Dress, 1800-1909

"Period Costume for Stage & Screen: Patterns for Outer Garments I: Cloaks, Capes, Stoles and Wadded Mantles" by Jean Hunnisett, ISBN 978-0887346651
Period Costume for Stage & Screen: Patterns for Outer Garments : Cloaks, Capes, Stoles and Wadded Mantles

"Period Costume for Stage & Screen: Patterns for Outer Garments II: Patterns for Outer Garments : Dominos, Dolmans, Coats, Pelisses, Spencers, Callashes, Hoods and Bonnets" by Jean Hunnisett, ISBN 978-0887346705
Period Costume for Stage and Screen: Patterns for Outer Garments : Dominos, Dolmans, Coats, Pelisses, Spencers, Callashes, Hoods and Bonnets: Dominos, ... Spencers, Callashes, Hoods & Bonnets

"Patters of Fashion Vol. 3 1560-1620"
by Janet Arnold, ISBN 978-0333382844

 Patterns of Fashion: c1560-1620

"Patterns of Fashion Vol. 1 1660-1860 - Englishwomen's Dresses and their Construction" by Janet Arnold, ISBN 978-0896760264

Patterns of Fashion 1 Englishwomen's Dresses & Their Construction C. 1660-1860

"Patterns of Fashion Vol. 2 1860-1940" by Janet Arnold, ISBN 978-0333136072
 Patterns of Fashion

"Patterns of Fashion Vol. 4 - The Cut and Construction of Linen Shirts, Smocks, Neckwear, Headwear and Accessories for Men and Women c. 1540 - 1660" by Janet Arnold, ISBN 978-0333570821
 Patterns of Fashion 4: The Cut and Construction of Linen Shirts, Smocks, Neckwear, Headwear and Accessories for Men and Women C. 1540 - 1660

"Corsets and Crinolines" by Norah Waugh, ISBN
0878305262
Corsets and Crinolines

"Corsets: Historic Patterns and Techniques" by Jill Salen, ISBN 1906388016
Corsets: Historic Patterns and Techniques


"Underwear Fashion in Detail" by Eleri Lynn, ISBN 1851777849
 Underwear Fashion in Detail

"The Dictionary of Fashion History" by Valerie Cumming et al., ISBN 1847885330
The Dictionary of Fashion History


"Fashion History: A History from the 18th to the 20th Century" by Akiki Fukai, ISBN 3822827630
 Fashion: A History from the 18th to the 20th Century (Taschen 25th Anniversary)

"The Wearing of Costume: The Changing Techniques of Wearing Clothes and How to Move in Them, from Roman Britain to the Second World War" by Ruth M. Green, ISBN 0952114119
Wearing of Costume: The Changing Techniques of Wearing Clothes and How to Move in Them

"Seventeenth and Eighteenth Century Fashion in Detail" by Lucy Johnston, ISBN 978-1851775675

 Seventeenth and Eighteenth-Century Fashion in Detail: The 17th and 18th Centuries

"Nineteenth Century Fashion in Detail" by Lucy Johnston, ISBN 1851775722
 Nineteenth Century Fashion in Detail

"Fashioning Fashion" by Sharon Sadako Takeda, ISBN 3791350625
Fashioning Fashion: European Dress in Detail, 1700-1915 -

"The Tudor Tailor: Reconstructing Sixteenth Century Dress" by Jane Malcolm-Davies, ISBN 0713489855 
TheTudor Tailor Reconstructing Sixteenth-Century Dress by Mikhaila, Ninya ( Author ) ON Mar-30-2006, Paperback

"The History of Underclothes" by C. Willett and Phillis Cunnington, ISBN 978-0486271248
The History of Underclothes (Dover Fashion and Costumes)

"Patterns for Theatrical Costumes: Garments, Trims, and Accessories from Ancient Egypt to 1915" by Katherine Strand Holkeboer, ISBN 0896761258

Patterns for Theatrical Costumes: Garments, Trims, and Accessories from Ancient Egypt to 1915

"Costume: 1066-1990s" by John Peacock

Costume: 1066 to the Present (Third Edition) by Peacock, John (2006) Paperback

"Chronicle of Western Fashion" by John Peacock

[(The Chronicle of Western Costume: From the Ancient World to the Late Twentieth Century)] [Author: John Peacock] published on (September, 2003)

"Kleidung und Waffen der Früh- und Hochgotik 1150-1320" by Ulrich Lehnart, ISBN 3935616007 (german)

Kleidung und Waffen der Früh- und Hochgotik. 1150-1320

"Kleidung und Waffen der Spätgotik I, 1320-1370" by Ulrich Lehnart, ISBN 3980564282 (german)

Kleidung & Waffen der Spätgotik, Teil I: 1320 - 1370

"Kleidung und Waffen der Spätgotik II, 1370-1420" by Ulrich Lehnart, ISBN (german)

Kleidung und Waffen der Spätgotik: 1370-1420

"Kleidung und Waffen der Spätgotik III, 1420-1480" by Ulrich Lehnart, ISBN 3935616171 (german)

Kleidung und Waffen der Spätgotik III 1420-1480

"Das Buch der Wäsche - Ein Leitfaden zur zeit- und sachgemäßen Herstellung von Haus-, Bett- und Leibwäsche, sowie zu deren gründlicher Behandlung und Pflege unter Beigabe der erforderlichen naturgroßen Schnitte" by Brigitta Hochfelden & Marie Niedner, 1900; Reprint 1983, ISBN 3887460812 (german)

Das Buch der Wäsche

And in case you want to browse costume literature in general: