And here we go, merrily starting yet another project although none of the previously started has been finished yet! Who cares... ;) This time, it's a rococo dress for my sister, who has thankfully been persuaded into taking part in a play - for which she will be appropriately clothed, of course. Thus I'm going to alter the already existant pattern to her measurements (Hello challenge!) to produce (hopefully finishing it on time) a gown of light blue brocade with an underskirt of pale blue cotton and the usual trimmings in white lace and blue ribbon. White petticoat and chemise have already been finished (although petticoat has to be altered slightly).
So the petticoat is three metres of white cotton, pleated into the waistband to be closed with strings at the back and adorned with two lengths of white satin ribbon at the seam. I just want to add here that usually, rococo skirts had their opening slits at the hips, thus enabling the wearer to wear pockets beneath them. It's a costume in this case, so I went for the simpler way of putting the skirts on.
The underskirt of the dress is constructed similarly, only that here you have to shape the seam according to the panniers that are worn under it. Not necessary with the petticoats, as they won't be seen, but underskirt and dress have to have a curved seam, shorter at the front and back and longer at the sides that will be pushed up a little by the panniers. Along the seam runs a ruffled strip of the same fabric, conveniently hiding that I never sew seams by hand. The ruffle should be attached by hand, though.
Saturday, 28 August 2010

Wednesday, 28 July 2010
Chemise à la reine
And yet another new project... Well, actually not really. I started it months ago, then it gathered some dust while I finished a few other things, and now I have finally figured out how to do this thing without it looking too bulky. Problem was, when I started sewing the chemise, I was firmly convinced that I would have to line it. Well, you can imagine that two layers of gathered fabric - and be it just finest batiste - will inevitably cause anyone, no matter how slender, to look like a stuffed white sausage. Finally I figured that I'd be wearing petticoats beneath it anyway, so I could leave away the lining and just work with one layer of wonderfully light, sheer, fine batiste. Slow on the uptake sometimes :D Anyway. This is how it is approximately going to look like once it's finished:

I think the pic is from V&A Museum, but not quite sure, I have such a huge amount of random costume pics on my harddrive... This kind of dress became en vogue in the 1780s.
This time I tried a pattern from Norah Waugh's "The Cut of Women's Clothes". Only thing I altered was not to slit the dress completely at the front. My version is put on over the head, with a frill at the neckline and puffed sleeves. Currently attaching the sleeves and trying to remember where I put the rest of the fabric for the frill...

I think the pic is from V&A Museum, but not quite sure, I have such a huge amount of random costume pics on my harddrive... This kind of dress became en vogue in the 1780s.
This time I tried a pattern from Norah Waugh's "The Cut of Women's Clothes". Only thing I altered was not to slit the dress completely at the front. My version is put on over the head, with a frill at the neckline and puffed sleeves. Currently attaching the sleeves and trying to remember where I put the rest of the fabric for the frill...
Tuesday, 13 July 2010
Yellow rococo dress

I actually made this dress already years ago, but remade it last year to weed out a few flaws. The ribbons of the stomacher were only sewn on, being mere decoration, the bodice did not fit perfectly and there was too much fabric at the front of the skirt and not enough at the back to make the watteau-pleats fall nicely. Now everything has been corrected, and I'm almost completely satisfied with the outcome. The ribbons are now fully functional and are tied into bowties after the dress has been put on. That's how it should actually be.

The fabric of the dress is a printed cotton, no actual pattern, just shades of yellow that make up to a nice overall colour. Unfortunately I bought only about four metres, which is not enough if you want really nice pleats at the back. But they're okay for the simple summer dress it's intended to be. The stomacher and underskirt are very lightweight cotton in a matching shade of pale yellow. And yes, it was a helluva job to find exactly the right colour! Especially as I continually kept forgetting to take a swatch with me to the fabric store... Talk about scattiness :D In the first turn, I bought the wrong yellow - which led to me making a very nice late renaissance/early baroque peasant's dress. I'll put that one online someday. Anyway... A decent rococo/Georgian dress needs plenty of decoration, for which I used white lace, yellow braid, satin flowers and an attempt of self-made flowers made from the same fabric as the dress. Lace on the dress might not be completely period, but I'm no reenactor :P

I used the pattern and instructions I found on www.marquise.de - a very recommendable site. The lining of the back joins the front sections together, so the folds at the back can fall loosely. Front parts are also lined, as are the sleeves. The stomacher should actually be stiffened with boning (plastic, steel, whatever you prefer), I have to admit that I used cardboard in the first attempt. Hey, I was a beginner back then! ;D Worked quite nicely for some time but lost its shape over time so I redid it with boning and buckram. The stomacher is attached to the dress with hooks and eyes and covered by the eschelles, the bows, which close the robe over the stomacher. I've since add some embroidery.


The engageantes, means the white, lace-trimmed flounces on the sleeves, actually should belong to the chemise beneath, but I didn't bother with that and just stitched them to the dress. They can be taken off for washing.
The underskirt is decorated with a stripe of ruffled fabric along the hem. If I had known how difficult this is to iron...
The hat was actually a round place mat. Yes, hatting can be a very creative thing! :D I shaped it by moistening the centre a little and molding the centre and back so the hat can be worn on top of a rococo hairdo. It's decorated with lace, little silk flowers (or whatever they really consist of these days...) and yellow satin ribbon.

The lining is sheer white silk, sewn to a wire frame, and the whole thing is sewn to the brim of the hat as well as to the centre (beneath the lace ruffle on top so you don't see the stitches).

What's beneath this dress is a chemise, pocket hoops, hanging pockets (I already posted that) and a corset - though the latter isn't worn in the pictures, it was the hottest day of the year, and by the way, I'm currently re-working my rococo-stays because I misinterpreted something when I sewed them years ago.
The dress is completed by a silken fichú (neckerchief; not worn in pictures due to climbing mercury column) that I simply bought so I needn't bother with doing the rolled hem myself, and a little lace cap.
Saturday, 26 June 2010
Blue striped half-robe
I really should finish several other projects before starting a new one again, but that wouldn't be me... ;) The half-robe will be worn over a round robe - which I still have to make. Uh well... Anyway, I wanted to start working with this fabric: middle-blue cotton with weaved-in dark-blue and claret stripes; it's one of those I found and immediately knew what I wanted to make from it. Still adjusting the pattern, there's an odd piece that doesn't quite fit in, but I'll figure that out :D Said pattern is, again, from "Patterns of Fashion Vol. 1." - I somehow came to like this book really well! *bg*
Thursday, 17 June 2010
Blue and white striped regency dress
I did this one already years ago - and the first comment I got was that it looks like a nightgown! Wharrgarbl... Anyway. The pattern is from Norah Waugh, "The Cut of Women's Clothes: 1600-1930". Same procedure as every time: enlarge, fit, cut out, try on, adjust, sew. I left away the fluffy flounces of the original and instead finished the edges with lace. The dress is only slightly trained and therefore thankfully survived a march through the muddy forest quite well. The original dress would have been fastened at the front, but I didn't want the skirt to be open on any side, so I changed it and now it's put on over the head, the waist is just wide enough to allow that. Nonetheless I'm going to line the bodice, the gathered fabric keeps slipping out of position at the shoulders. Nothing beats a good lining...
It was while sewing this dress that I discovered the best way to pleat the back of the skirt, namely in a way that allows you to leave away the little pad that usually kept the skirt from falling into the hollow of the back. I'll post a sketch of it as soon as I got time to draw one ;)
It was while sewing this dress that I discovered the best way to pleat the back of the skirt, namely in a way that allows you to leave away the little pad that usually kept the skirt from falling into the hollow of the back. I'll post a sketch of it as soon as I got time to draw one ;)
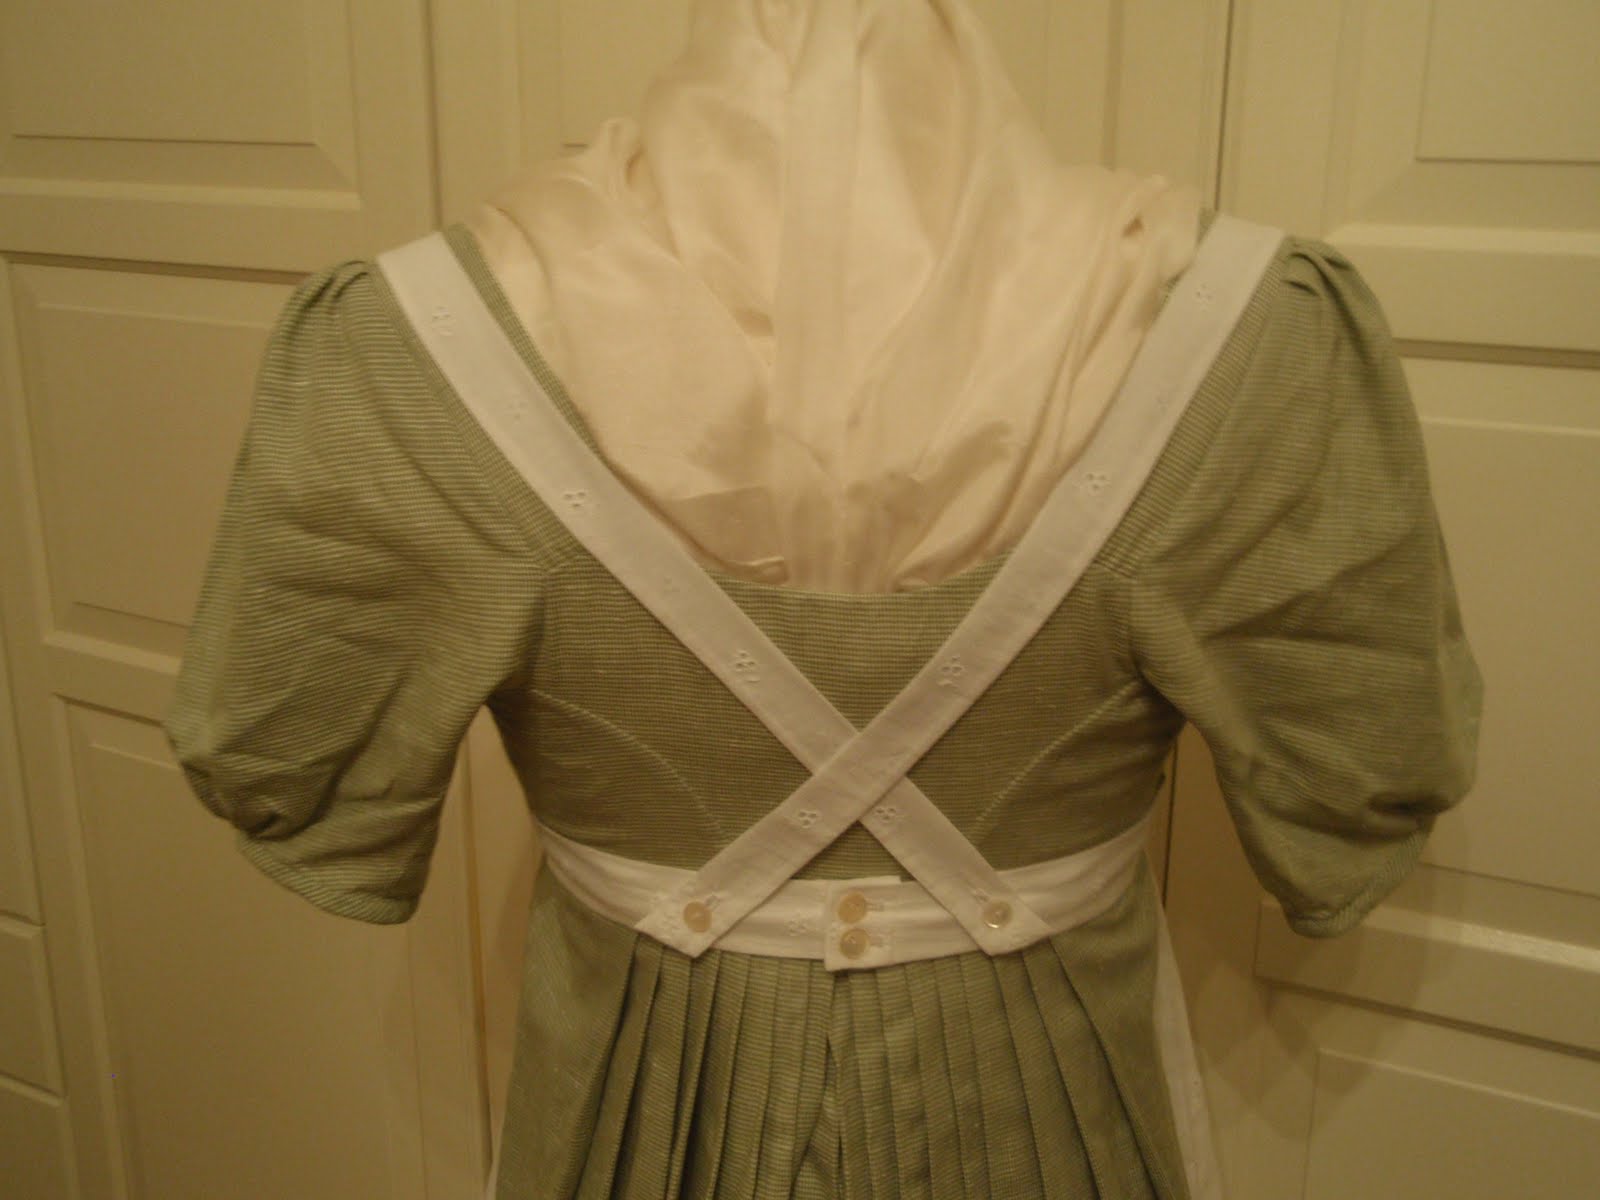
Regency apron

I somehow got caught in some kind of regency-faible (for lack of dress-stand to make late-rococo dress, meh!), so I decided to make a quick apron to go with my two dresses. The pattern is simple and can be found online or you can just cut the pieces yourself. I used a leftover piece of white fabric, machine-embroidered with small, unobtrusive flowers, visible seams are sewn by hand (I just had that fancy when I started). Closes at the back with little mother-of-pearl buttons. And yes, I should have ironed the apron for the pictures...

Green-golden renaissance dress

Another historic ball upcoming, and of course I needed a new dress - actually already in June. Well, as so many things in my life, it was begun early and finished very late, namely the following year :D I've had the fabric in my wardrobe for years, waiting for inspiration, and I found it in another pattern from one of Arnold's books and in a dress I found online. The fabric is a pale green with golden threads, looks lovely even in candlelight!

The skirt is trained this time (great thing for washing...), and again it was amazing how many gentlemen liked the train so much they stepped on it :D It's the usual skirt pattern, folded neatly into a lined waistband so the stiffer lining fabric helps to hold 4 1/2 metres of brocade. The train is about one foot long, which makes it long enough to look good and short enough to handle it even when dancing. The skirt should be worn over a slightly oval hoopskirt but I had to improvise (due to lack of time again) and wore it over a round hoopskirt with bum pad and a definitely non-period tulle underskirt. Anyway, who would dare peep under a lady's skirts! ;D
The bodice is the same pattern I used for the green-black renaissance dress (drafted it when I was fifteen, sheer beginner's luck!), with two layers of boned lining and a top layer of brocade. It's laced at the back. Just the front is boned to give the bust the flat shape typical for the renaissance period, and two pieces stiffen the closing at the back.
The sleeves can be taken off, as there are two pairs of sleeves to be worn with the dress. One consists of ten strips of brocade sewn into tubes and ironed flat, joined at the wrist and at the shoulder and decorated with pearls (or gold ornaments? let's see...) in between. With these sleeves, the dress is worn over a renaissance chemise. The second pair of sleeves (still to be sewn) will be puffy at the shoulders and tight along the rest of the arm, to be made from the scraps of fabric that were left when cutting the trim pieces for sleeves #1.
Subscribe to:
Posts (Atom)