A friend recently gave me a regency dress she wasn't happy with. The reason was quickly discovered and is one of the most common difficulties when sewing for this period: the front skirt part didn't fit at all. The tricky part is to keep it as flat as possible while still putting enough fabric to the front to keep it from clinging to your belly but not making you look pregnant - which requires shaping the top edge a bit.
So first step: undo the front half of the waist seam and the side seams, as well as the hem which will also have to be adjusted. The upper edge of the front skirt piece is cut out in a slight curve, the sides are cut slightly at an angle. This helps to keep the front flat because this slightly trapezoide shape gives more fabric at the hem where it's needed while keeping the upper part as smooth as possible without adding bulk. Two small tucks (one under each breast) also help. I also had to take a little width out of the bodice, taking in the side seams beneath the sleeves, then closed the side seams again. Always check if the pleated back part of the skirt doesn't come too far to the front, which would ruin the silhouette. Which it didn't do here, so I could adjust the hem and finish a very practical day dress. It can be worn without any kind of undergarments (like corset or even bust-shaping shift) thus being the perfect choice for summer reenactments. Yay again to me being a stick figure :D
Showing posts with label Regency. Show all posts
Showing posts with label Regency. Show all posts
Monday, 9 December 2019

Thursday, 30 May 2019
Green regency hat
If you happen to find a woven golf visor straw hat, buy ten of them, they make lovely regency hats! I found one with a hatband matching my dress which I hastily decorated for a first outing, then took apart, shaped properly and decorated anew.

The crown is rather flat, as it's designed to be worn as sun protection and flat on your head. I beribboned it and during the first trip discovered a few flaws due to this shape.

It doesn't sit on your head tight enough, and tends to slip up or down depending on where on the back of your head your hairdo is. Plus it just looks like a golf visor hat repurposed. So once back, I set myself to do the thing properly. Which meant stripping it of five hours' worth of hand-stitched-on trimming, moistening the crown (spray with water, inside and outside) and putting it into a flower pot for shaping :D You take what you can get... Make sure to remove all ribbons, sweatbands etc., you want just the plain straw weave.

Let dry over night and you'll get a nice, cone-shaped crown, still flexible enough to fit to your head. The bottom of the crown can remain round or you can flatten it once the actual size has been determined.

Put this on as you would the finished hat, if possible with updone hair so you discover where it sits perfectly. Sew a plain cotton ribbon around right where the brim starts to retain this size. If you like, you can flatten the back of the crown by moistening it again and pressing it flat. I just put it on the floor and put a bottle into the crown. Simple as that.
In the meantime, buy a properly shaped hat at a reenactment because you lose your patience and need sun protection...
I sewed the previous green hatband back on (invisible stitches), as well as the satin ribbons. All that's missing now are the proper pictures ;)

The crown is rather flat, as it's designed to be worn as sun protection and flat on your head. I beribboned it and during the first trip discovered a few flaws due to this shape.


Let dry over night and you'll get a nice, cone-shaped crown, still flexible enough to fit to your head. The bottom of the crown can remain round or you can flatten it once the actual size has been determined.

Put this on as you would the finished hat, if possible with updone hair so you discover where it sits perfectly. Sew a plain cotton ribbon around right where the brim starts to retain this size. If you like, you can flatten the back of the crown by moistening it again and pressing it flat. I just put it on the floor and put a bottle into the crown. Simple as that.
In the meantime, buy a properly shaped hat at a reenactment because you lose your patience and need sun protection...
I sewed the previous green hatband back on (invisible stitches), as well as the satin ribbons. All that's missing now are the proper pictures ;)
Monday, 1 October 2018
Fingerless mittens
I had yarn left that I wanted to use up, and I wanted an upper-class pair of mittens for rococo and regency, so I found myself some nice sock pattern (there's plenty of them!) that I adapted for mittens.
For the edge, I used the Bintje pattern from https://www.ravelry.com/, the pattern of the mittens being DROPS design: model nr. FA-146 from the German knitting page www.garnstudio.com.
The pattern is pretty easy to knit if you have a bit of experience, as it's logic and repetitive. Don't forget the counting, though ;)
For the edge, I used the Bintje pattern from https://www.ravelry.com/, the pattern of the mittens being DROPS design: model nr. FA-146 from the German knitting page www.garnstudio.com.
The pattern is pretty easy to knit if you have a bit of experience, as it's logic and repetitive. Don't forget the counting, though ;)
Tuesday, 11 September 2018
Teal regency gown aka "Frankenstein dress"
There's a historic 200-years-Mary-Shelley-Frankenstein-ball and you
need a dress. Being a nerd who loves the novel, you put in as many hints
as possible: the style of the dress is slightly oriental, the
semi-transparent teal fabric is underlaid with a shimmering, silvery
fabric and decorated with silver metal trim, a silver crescent decorates
the headband and the front of the double-sided locket shows a river
scenery with a castle. Avid readers will understand the allusions ;)
The bodice pattern is based on the one from my white ball gown, closing with buttons on the back; only this time I modified the outer layer, which is smooth at the neckline and gathered at the bosom, the pleats opening towards the neckline. I'm sure there's a ready-made pattern for this out there somewhere, but again, I had four evenings (plus a flight and an hour in Regent's Park) to complete the entire dress, from pattern to trimming... The lining is made from the silver rayon I used for the skirt of the shift.
The sleeves are not puffed this time, but slightly gathered at the top and open, ending in a tip decorated with a small silver tassel.
The skirt is attached to the gown beneath a sash of the same fabric, the edges (double sided where they hang down...) trimmed with approximately eight metres of silver braid, tassels at the ends. I did indeed use my usual amount of fabric for the skirt, three fabric widths with the sides of the front panel cut slightly aslant to make for a better fit. If you gather such an amount of fabric at the back of a dress, remember to cut the back neckline a little higher than intended, and the back side of the bodice a little shorter, as good old gravity will unite with the weight of the train and pull the dress a bit to the back when worn. Helps to lift the bosom to a perfect Regency level, by the way ;) And talking of the Regency waist, here's a most helpful guide to the slight changes in shape in each decade: http://www.uvm.edu/~hag/regency/tips/

The shift is a bodiced petticoat after my much-favoured push-up design. The skirt that's visible when dancing is made from a lovely, silver rayon which has a metallic sheen to it that's even visible through the upper layer. The bodice part is made from two layers of cotton for support. The teal dress does have a sash beneath the bust, but it's just decorative, not for actually keeping the dress in place
With this dress I finally found the perfect length for a train which isn't stepped on too often when dancing contredanses and still looks good when waltzing (btw it also is the first ballgown I ever made that was worn twice in two consecutive days, very economic!)
There's also a shawl now to go with this dress, as I found matching wool when at a Frankenstein conference in Ingolstadt - some things come togehter so absurdly nicely you couldn't plan them any better! The pattern is the Aeolian Shawl from knitty.com. There's some slightly glittery but unobtrusive synthetic thread spun into the wool that goes well with the idea of starry sky or electricity, and as also in previous centuries they did use metal threads together with wool for knitting, it's still period enough. The shawl is more like a decorative kerchief, covering the shoulders and the back, but doesn't reach past the sleeves of the dress. I bought more wool than needed with the intention of making matching fingerless mitts...
 |
| Gathering the material. The picture does the silver fabric no credit. |
The bodice pattern is based on the one from my white ball gown, closing with buttons on the back; only this time I modified the outer layer, which is smooth at the neckline and gathered at the bosom, the pleats opening towards the neckline. I'm sure there's a ready-made pattern for this out there somewhere, but again, I had four evenings (plus a flight and an hour in Regent's Park) to complete the entire dress, from pattern to trimming... The lining is made from the silver rayon I used for the skirt of the shift.
The sleeves are not puffed this time, but slightly gathered at the top and open, ending in a tip decorated with a small silver tassel.
The skirt is attached to the gown beneath a sash of the same fabric, the edges (double sided where they hang down...) trimmed with approximately eight metres of silver braid, tassels at the ends. I did indeed use my usual amount of fabric for the skirt, three fabric widths with the sides of the front panel cut slightly aslant to make for a better fit. If you gather such an amount of fabric at the back of a dress, remember to cut the back neckline a little higher than intended, and the back side of the bodice a little shorter, as good old gravity will unite with the weight of the train and pull the dress a bit to the back when worn. Helps to lift the bosom to a perfect Regency level, by the way ;) And talking of the Regency waist, here's a most helpful guide to the slight changes in shape in each decade: http://www.uvm.edu/~hag/regency/tips/

The shift is a bodiced petticoat after my much-favoured push-up design. The skirt that's visible when dancing is made from a lovely, silver rayon which has a metallic sheen to it that's even visible through the upper layer. The bodice part is made from two layers of cotton for support. The teal dress does have a sash beneath the bust, but it's just decorative, not for actually keeping the dress in place
With this dress I finally found the perfect length for a train which isn't stepped on too often when dancing contredanses and still looks good when waltzing (btw it also is the first ballgown I ever made that was worn twice in two consecutive days, very economic!)
There's also a shawl now to go with this dress, as I found matching wool when at a Frankenstein conference in Ingolstadt - some things come togehter so absurdly nicely you couldn't plan them any better! The pattern is the Aeolian Shawl from knitty.com. There's some slightly glittery but unobtrusive synthetic thread spun into the wool that goes well with the idea of starry sky or electricity, and as also in previous centuries they did use metal threads together with wool for knitting, it's still period enough. The shawl is more like a decorative kerchief, covering the shoulders and the back, but doesn't reach past the sleeves of the dress. I bought more wool than needed with the intention of making matching fingerless mitts...
 |
| Wool in daylight, it's actually a shade darker. |
 |
| Finished shawl, it's a bit lighter actually. |
Tuesday, 4 September 2018
How to get vintage leather gloves soft
Only once was I lucky enough to find unused vintage leather gloves, delightfully soft and of perfect cream-white colour. Usually you're not so lucky and have to deal with used second-hand pairs that may be discoloured; and I, for my part, prefer to wash them and disinfect the inside if I buy them at a flea market. Even using a detergent specifically for leather doesn't help much, the leather comes out rather stiff after drying. Here's a collection of insights I gained through experimenting a bit.
- In general, leather gloves should be washed while wearing them and gently washing your hands with the gloves on, using a leather detergent. Rinse thoroughly. Squeeze the water out gently, if possible by rolling them to avoid crinkling. Dry on a towel that you change once it's too wet. NEVER dry on a radiator, it spoils the leather and makes it hard!
- To adjust gloves to your size, either widen them with a finger stretcher or the handle of a wooden spoon while still moist. Best thing is to put them on while still moist.
- While drying, put the gloves on several times and roll them to keep them supple and adjusted to the shape of your hands.
- If, despite all your efforts, the gloves still come out stiff and inflexible (especially funny if they go past your elbows and you can't bend them anymore...), turn them inside out and rub them thoroughly with uncoloured hand lotion or lanolin to replenish the missing grease in the leather. DO NOT use leather care grease, as it's usually yellowish and may discolour your gloves. Some gloves can also be greased gently on the outside, but you'll have to try. NEVER grease suede gloves from the outside!
- If you wear white leather gloves at a ball, don't let sweaty-handed partners touch your gloves without gloves of their own, the sweat discolours the leather (which is basically what must have happened to my extra-long pair).

And this happens if you rub a glove with Via... :D - well, this happens if your gloves come out with the rigidity of cardboard after washing and you have to treat them with hand lotion. Left one thoroughly lotioned from the inside, right one not. They became perfectly supple again, adjusted to my hands and let me bend my elbows. What more do you wish for! Well, they could be a little cleaner, the palms being really greyed (see sweaty-palmed-partner-problem above). I'll figure that out one day...
- In general, leather gloves should be washed while wearing them and gently washing your hands with the gloves on, using a leather detergent. Rinse thoroughly. Squeeze the water out gently, if possible by rolling them to avoid crinkling. Dry on a towel that you change once it's too wet. NEVER dry on a radiator, it spoils the leather and makes it hard!
- To adjust gloves to your size, either widen them with a finger stretcher or the handle of a wooden spoon while still moist. Best thing is to put them on while still moist.
- While drying, put the gloves on several times and roll them to keep them supple and adjusted to the shape of your hands.
- If, despite all your efforts, the gloves still come out stiff and inflexible (especially funny if they go past your elbows and you can't bend them anymore...), turn them inside out and rub them thoroughly with uncoloured hand lotion or lanolin to replenish the missing grease in the leather. DO NOT use leather care grease, as it's usually yellowish and may discolour your gloves. Some gloves can also be greased gently on the outside, but you'll have to try. NEVER grease suede gloves from the outside!
- If you wear white leather gloves at a ball, don't let sweaty-handed partners touch your gloves without gloves of their own, the sweat discolours the leather (which is basically what must have happened to my extra-long pair).
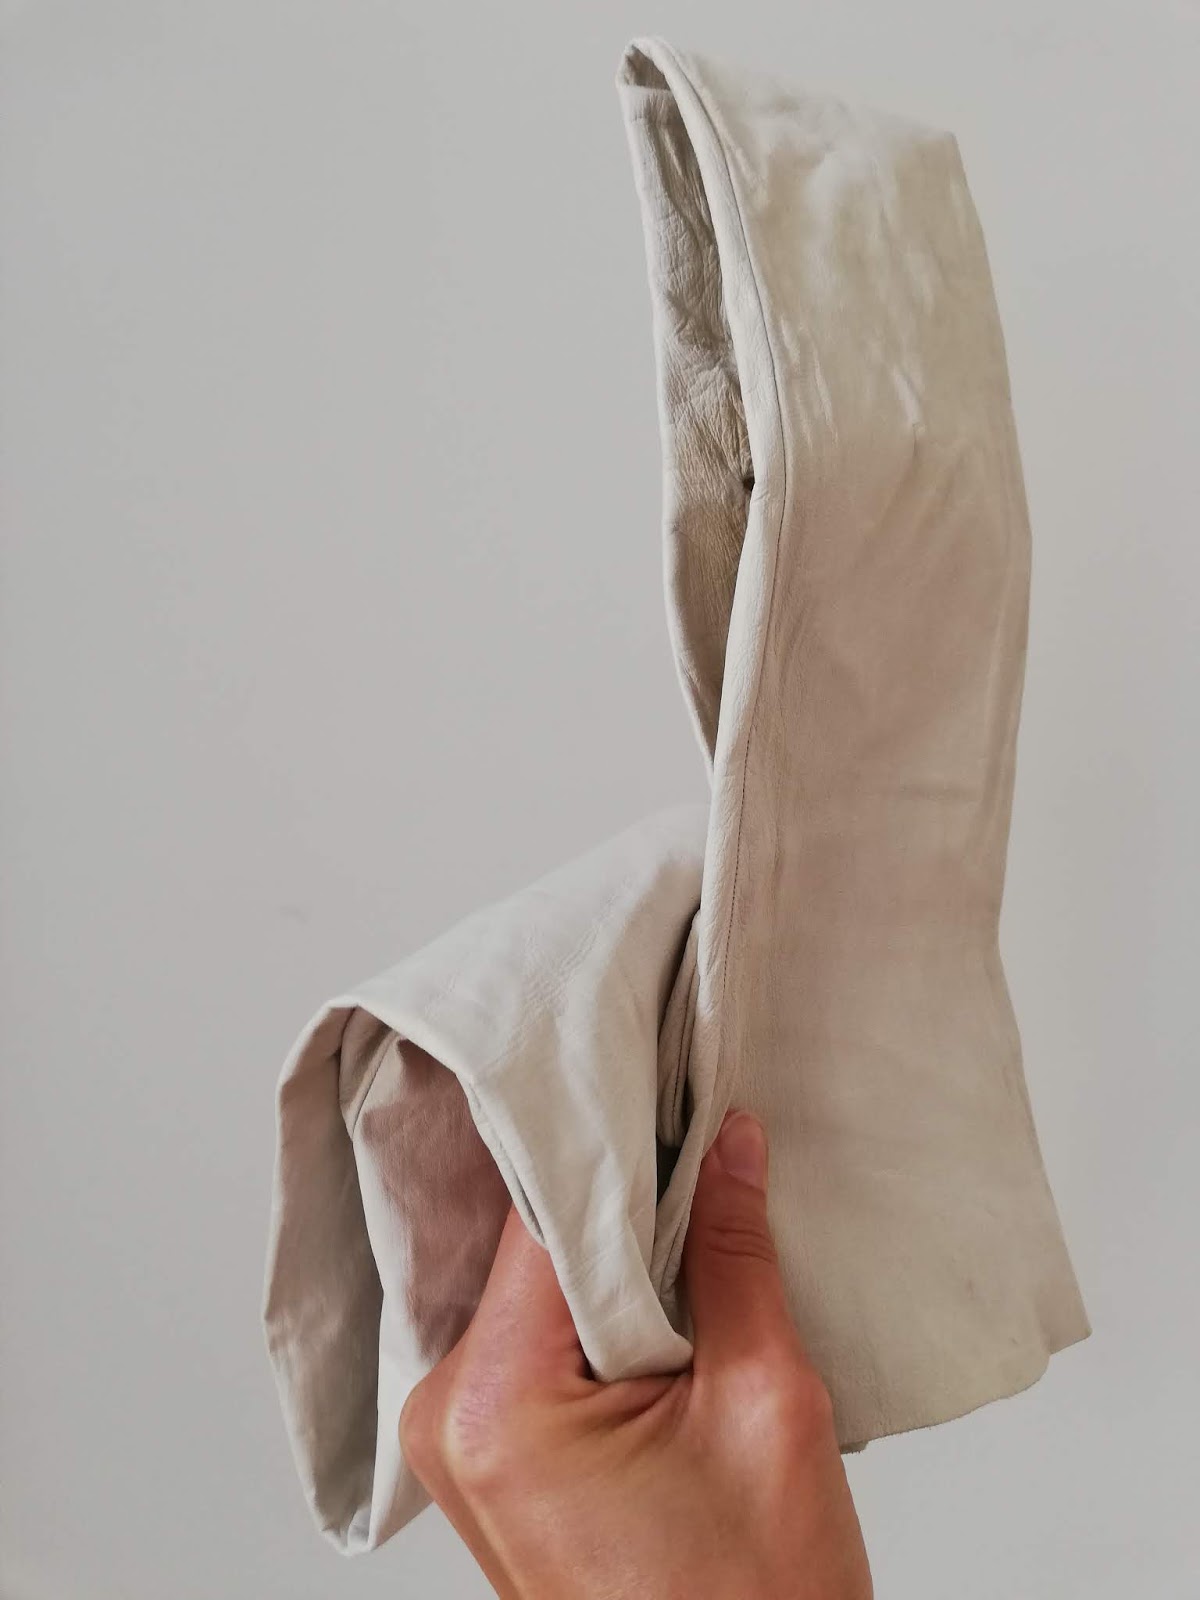
And this happens if you rub a glove with Via... :D - well, this happens if your gloves come out with the rigidity of cardboard after washing and you have to treat them with hand lotion. Left one thoroughly lotioned from the inside, right one not. They became perfectly supple again, adjusted to my hands and let me bend my elbows. What more do you wish for! Well, they could be a little cleaner, the palms being really greyed (see sweaty-palmed-partner-problem above). I'll figure that out one day...
Monday, 3 September 2018
Light green regency dress
Another upcoming event with three days' programme, requiring therefore an adequate number of dresses. For summer. In Italy. Fabric as light as possible. I bought a very nice, sheer cotton/poly-mixture some time ago which was now turned into the intended short-sleeved, non-iron day-dress.
The skirt is a bit less wide than my usual regency dresses, with only a small train but still full enough to billow nicely in a gust of wind or when running.
The bodice follows a pattern I have already tried and lost again in the course of moving twice, so had to design it anew. The fabric being so nice and sheer, it's gathered all around (front a bit more than the back) over a smooth lining (following my push-up-pattern). The neckline is moderate, to be worn with or without a fichù. Simple, richly puffed sleeves, the lining closes with hooks and eyes, the bodice with little buttons at the back.
A cream satin ribbon has now been added as a sash to round things off nicely.
The skirt is a bit less wide than my usual regency dresses, with only a small train but still full enough to billow nicely in a gust of wind or when running.
 |
| Picture by Marcus A. |
The bodice follows a pattern I have already tried and lost again in the course of moving twice, so had to design it anew. The fabric being so nice and sheer, it's gathered all around (front a bit more than the back) over a smooth lining (following my push-up-pattern). The neckline is moderate, to be worn with or without a fichù. Simple, richly puffed sleeves, the lining closes with hooks and eyes, the bodice with little buttons at the back.
 |
| Picture by Roberto Fusconi |
Wednesday, 25 November 2015
Cabochon jewelry
Pretty simple once you've gathered all the ingredients, like frame, glass, glue, and pictures. The glass covers come in flat and convex. If you're using convex covers, only choose landscapes, flowers or anything neutral as your motif. Portraits only go well (i.e. undistorted) with flat glass, and you don't want your fiancé at twice his breadth on your necklace ;)
The trickiest thing is to avoid bubbles of air when you glue the images to the glass. I find it easiest to put a generous dollop of glue on the flat side of the cabochon, press the picture onto the glue and wiggle it very gently until it has spread the glue all over the glass and lies down flat. Dry on a flat surface (some hours will be enough, I just leave mine overnight), cut away the excess paper and glue to the metal frame.
 The simplest way of wearing them would be to attach them to a piece of satin ribbon or a slender metal chain, or you can attach them to any pearl or bead necklace, lace ruff (expecially for rococo), or whatever you fancy.

For a rose quartz version I also added a matching pendant, the beads are rose quartz and crystal.
A very nice thing is a two-faced version. Take two pieces of the same foundation style and very diligently glue them back to back with some jewellery glue so they're absolutely apposite. For the front picture, proceed as above, with a rounded cabochon and a nice picture. For the reverse side that is to remain hidden when worn, use a flat cabochon so the pendant won't turn but remain nice and tidy with the flat side down and the convex side up and you can keep your secret lover's picture nicely hidden ;) If you're in a hurry and there are no flat cabochons at hand, it also works well with a piece of clear plastic cut into shape to cover the picture.
The trickiest thing is to avoid bubbles of air when you glue the images to the glass. I find it easiest to put a generous dollop of glue on the flat side of the cabochon, press the picture onto the glue and wiggle it very gently until it has spread the glue all over the glass and lies down flat. Dry on a flat surface (some hours will be enough, I just leave mine overnight), cut away the excess paper and glue to the metal frame.


For a rose quartz version I also added a matching pendant, the beads are rose quartz and crystal.
A very nice thing is a two-faced version. Take two pieces of the same foundation style and very diligently glue them back to back with some jewellery glue so they're absolutely apposite. For the front picture, proceed as above, with a rounded cabochon and a nice picture. For the reverse side that is to remain hidden when worn, use a flat cabochon so the pendant won't turn but remain nice and tidy with the flat side down and the convex side up and you can keep your secret lover's picture nicely hidden ;) If you're in a hurry and there are no flat cabochons at hand, it also works well with a piece of clear plastic cut into shape to cover the picture.
Tuesday, 4 August 2015
Regency ball gown
Well, I know, I already have one... But does that really matter if you find some nice fabric? Unfortunately it's only polyester, and the gold embroidery is just machine-made - but considering that it looks nice enough from average distance and will go into the washing machine after the ball it perfectly serves the purpose of a good-look-easy-care ballgown. Although I'm already toying with the idea of improving the embroidery with a few golden beads and putting some golden lace around the neckline, which would totally defy the idea of putting it into the washing machine...

The whole pattern follows exactly my previously made white regency ball-gown, and I can even use the supporting chemise, which I remember was the toughest piece of work when I designed the other dress. And while the latter was decorated with pearls, this one is going to get golden decoration.
As the seam is embroidered I wasn't able to make length adjustments here. But a train was essential, so I had to adjust the length by curving the underbust seam. It pushes more fabric to the front, but with some adjustments in the folding it's ok.
..........
And to add to the splendour, I intend to make a velvet manteau to go with both my gowns, not so much for the cold evenings but for a splendid entrée ;)

The whole pattern follows exactly my previously made white regency ball-gown, and I can even use the supporting chemise, which I remember was the toughest piece of work when I designed the other dress. And while the latter was decorated with pearls, this one is going to get golden decoration.
As the seam is embroidered I wasn't able to make length adjustments here. But a train was essential, so I had to adjust the length by curving the underbust seam. It pushes more fabric to the front, but with some adjustments in the folding it's ok.
..........
And to add to the splendour, I intend to make a velvet manteau to go with both my gowns, not so much for the cold evenings but for a splendid entrée ;)
Sunday, 30 June 2013
White regency ballgown
Another quick one to use up fabric that has been in my store for at least five years. I was just waiting for the perfect pattern, because I wanted a very low décolletage - which requires a clever solution for the understructure to go without any bra or modern tricks.

The satin fabric is for the "pushup-chemise", the actual cream-white fabric is a cotton-something-mix with all advantages of a mixture and so far no notable disadvantages. It's iron-free, drapes nicely and wears well. The small woven pattern demanded a cut without much gathering of the bodice to show the pattern. That was the biggest challenge about that dress, and the reason for my waiting so long. You need the perfect day to design an almost immediately fitting pattern! The dress is garnished just with slender needlepoint lace and satin ribbon. It closes with three square mother-of-pearl buttons (and a few hidden hooks and eyes) at the back. The skirt measures almost five metres round the hem and was pretty tricky to gather to give it a perfect, slender silhouette without wrinkling or bulging. The train is two foot long and can be taken up for dancing. Maybe I'll add some little pearls for decoration round the neckline and sleeves, let's see...

Saturday, 26 June 2010
Blue striped half-robe
I really should finish several other projects before starting a new one again, but that wouldn't be me... ;) The half-robe will be worn over a round robe - which I still have to make. Uh well... Anyway, I wanted to start working with this fabric: middle-blue cotton with weaved-in dark-blue and claret stripes; it's one of those I found and immediately knew what I wanted to make from it. Still adjusting the pattern, there's an odd piece that doesn't quite fit in, but I'll figure that out :D Said pattern is, again, from "Patterns of Fashion Vol. 1." - I somehow came to like this book really well! *bg*
Thursday, 17 June 2010
Blue and white striped regency dress
I did this one already years ago - and the first comment I got was that it looks like a nightgown! Wharrgarbl... Anyway. The pattern is from Norah Waugh, "The Cut of Women's Clothes: 1600-1930". Same procedure as every time: enlarge, fit, cut out, try on, adjust, sew. I left away the fluffy flounces of the original and instead finished the edges with lace. The dress is only slightly trained and therefore thankfully survived a march through the muddy forest quite well. The original dress would have been fastened at the front, but I didn't want the skirt to be open on any side, so I changed it and now it's put on over the head, the waist is just wide enough to allow that. Nonetheless I'm going to line the bodice, the gathered fabric keeps slipping out of position at the shoulders. Nothing beats a good lining...
It was while sewing this dress that I discovered the best way to pleat the back of the skirt, namely in a way that allows you to leave away the little pad that usually kept the skirt from falling into the hollow of the back. I'll post a sketch of it as soon as I got time to draw one ;)
It was while sewing this dress that I discovered the best way to pleat the back of the skirt, namely in a way that allows you to leave away the little pad that usually kept the skirt from falling into the hollow of the back. I'll post a sketch of it as soon as I got time to draw one ;)
Regency apron

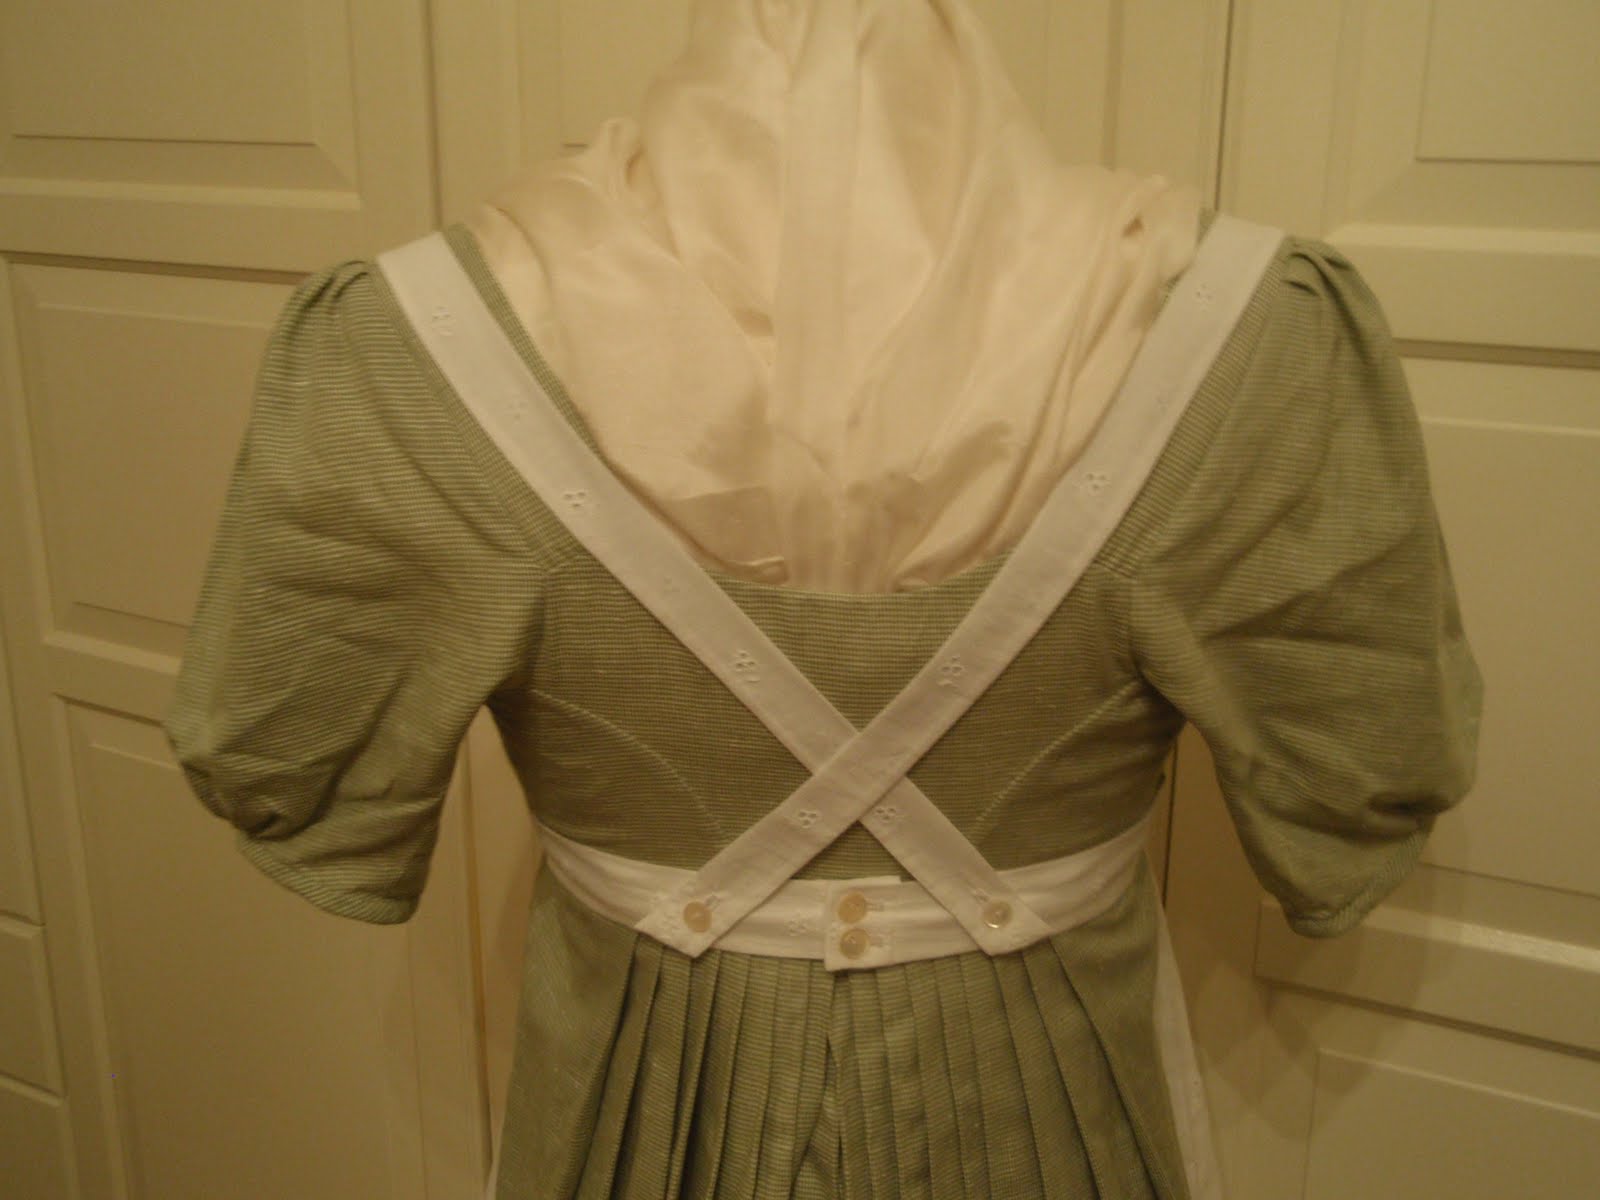
I somehow got caught in some kind of regency-faible (for lack of dress-stand to make late-rococo dress, meh!), so I decided to make a quick apron to go with my two dresses. The pattern is simple and can be found online or you can just cut the pieces yourself. I used a leftover piece of white fabric, machine-embroidered with small, unobtrusive flowers, visible seams are sewn by hand (I just had that fancy when I started). Closes at the back with little mother-of-pearl buttons. And yes, I should have ironed the apron for the pictures...

Monday, 15 March 2010
Green regency drop-front dress


After some inspiration I sat down to make a quick regency dress from some material that had already been waiting for me to get motivated again. The inspiration was actually 1860s stuff, but regency was first in line on my to-do-list :) Again the pattern is from Janet Arnold's "Patterns of Fashion Vol. 1".

The fabric looks quite plain, still the more as the photo turned the green into some kind of pale mud-brown. Actually it's a tiny woven pattern of white and linden green which looks very nice once it's made into a dress.
I still don't know exactly how I managed to fit the pattern to my body, but somehow it worked even without a dress stand - thankfully! 1 1/2 days of sewing and an equal amount of time for the finishing touches, and now it's almost perfect (not completely satisfied with the sleeves, but anyway...). I didn't expect so much hand-sewing for the details of the bodice to be necessary, but it really paid off. Very clever pattern, the bodice gives a wonderful push-up effect and hence makes a very nice silhouette, and the dress itself does not only look good but also wears very well.

The front flap has three rows of tucks that I sewed with the sewing machine and afterwards overstitched them by hand. Thus the seams are very strong but still look period. The flap closes with hooks and eyes that are hidden by little mother-of-pearl buttons.

Beneath the flap is the gown's secret, the built-in push-up lining that closes with two hooks and eyes beneath the bust and over it with four buttons.


Subscribe to:
Posts (Atom)