Saturday, 26 June 2010
Blue striped half-robe
I really should finish several other projects before starting a new one again, but that wouldn't be me... ;) The half-robe will be worn over a round robe - which I still have to make. Uh well... Anyway, I wanted to start working with this fabric: middle-blue cotton with weaved-in dark-blue and claret stripes; it's one of those I found and immediately knew what I wanted to make from it. Still adjusting the pattern, there's an odd piece that doesn't quite fit in, but I'll figure that out :D Said pattern is, again, from "Patterns of Fashion Vol. 1." - I somehow came to like this book really well! *bg*

Thursday, 17 June 2010
Blue and white striped regency dress
I did this one already years ago - and the first comment I got was that it looks like a nightgown! Wharrgarbl... Anyway. The pattern is from Norah Waugh, "The Cut of Women's Clothes: 1600-1930". Same procedure as every time: enlarge, fit, cut out, try on, adjust, sew. I left away the fluffy flounces of the original and instead finished the edges with lace. The dress is only slightly trained and therefore thankfully survived a march through the muddy forest quite well. The original dress would have been fastened at the front, but I didn't want the skirt to be open on any side, so I changed it and now it's put on over the head, the waist is just wide enough to allow that. Nonetheless I'm going to line the bodice, the gathered fabric keeps slipping out of position at the shoulders. Nothing beats a good lining...
It was while sewing this dress that I discovered the best way to pleat the back of the skirt, namely in a way that allows you to leave away the little pad that usually kept the skirt from falling into the hollow of the back. I'll post a sketch of it as soon as I got time to draw one ;)
It was while sewing this dress that I discovered the best way to pleat the back of the skirt, namely in a way that allows you to leave away the little pad that usually kept the skirt from falling into the hollow of the back. I'll post a sketch of it as soon as I got time to draw one ;)
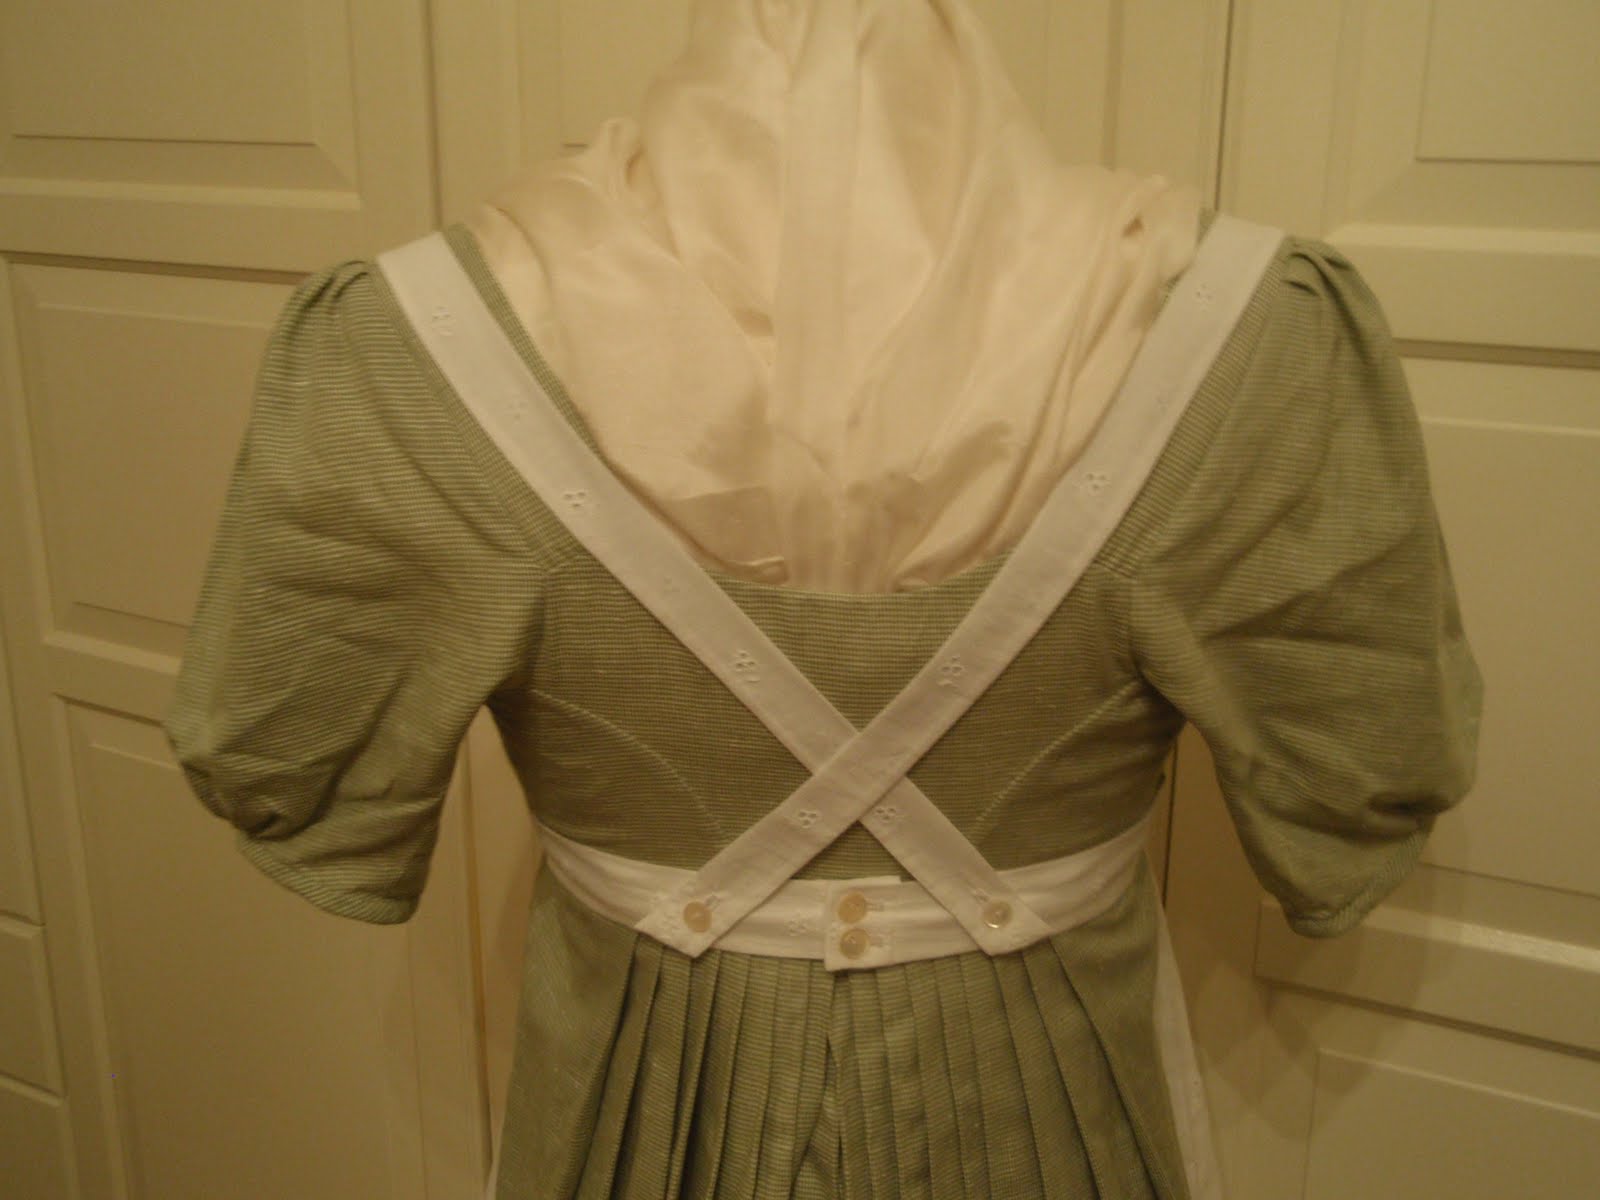
Regency apron

I somehow got caught in some kind of regency-faible (for lack of dress-stand to make late-rococo dress, meh!), so I decided to make a quick apron to go with my two dresses. The pattern is simple and can be found online or you can just cut the pieces yourself. I used a leftover piece of white fabric, machine-embroidered with small, unobtrusive flowers, visible seams are sewn by hand (I just had that fancy when I started). Closes at the back with little mother-of-pearl buttons. And yes, I should have ironed the apron for the pictures...

Green-golden renaissance dress

Another historic ball upcoming, and of course I needed a new dress - actually already in June. Well, as so many things in my life, it was begun early and finished very late, namely the following year :D I've had the fabric in my wardrobe for years, waiting for inspiration, and I found it in another pattern from one of Arnold's books and in a dress I found online. The fabric is a pale green with golden threads, looks lovely even in candlelight!

The skirt is trained this time (great thing for washing...), and again it was amazing how many gentlemen liked the train so much they stepped on it :D It's the usual skirt pattern, folded neatly into a lined waistband so the stiffer lining fabric helps to hold 4 1/2 metres of brocade. The train is about one foot long, which makes it long enough to look good and short enough to handle it even when dancing. The skirt should be worn over a slightly oval hoopskirt but I had to improvise (due to lack of time again) and wore it over a round hoopskirt with bum pad and a definitely non-period tulle underskirt. Anyway, who would dare peep under a lady's skirts! ;D
The bodice is the same pattern I used for the green-black renaissance dress (drafted it when I was fifteen, sheer beginner's luck!), with two layers of boned lining and a top layer of brocade. It's laced at the back. Just the front is boned to give the bust the flat shape typical for the renaissance period, and two pieces stiffen the closing at the back.
The sleeves can be taken off, as there are two pairs of sleeves to be worn with the dress. One consists of ten strips of brocade sewn into tubes and ironed flat, joined at the wrist and at the shoulder and decorated with pearls (or gold ornaments? let's see...) in between. With these sleeves, the dress is worn over a renaissance chemise. The second pair of sleeves (still to be sewn) will be puffy at the shoulders and tight along the rest of the arm, to be made from the scraps of fabric that were left when cutting the trim pieces for sleeves #1.
Sunday, 18 April 2010
Musketeer outfit
...or how to clothe a baroque gentleman properly if you have to work quickly and on a budget. I really love planning other people's costumes, but how come I never seem to have enough time to actually finish them?! Again, pattern from "Patterns for Theatrical Costumes". Let's see how this one turns out.

Unfortunately my camera refused to depict the exact colour of the fabric. The brocade for the doublet is a rich golden colour, the linen for the trousers a warm, dark brown with a tinge of gold to it.
Well, the first thing to begin with are always the boots, right? No? Anyway... As there's no time to go for real boots, I decided to make fake ones, means boot-legs that are worn over over normal shoes (in this case 18th century low shoes that fit nicely). A double layer of fake suede (the slightly stiffened version) works quite well, the top is adorned with a row of lace that's stitched invisibly to the inside layer. The instep where bootleg and actual shoe meet is covered by this butterfly-shaped leather thingy that's so typical for this kind of boots, and a stirrup in a matching colour keeps the whole thing in place. The work of one evening, and it's done very neatly.
Next step are the trousers, loose breeches in this case that end shortly below the knee, just above where the boots start (so it's actually a good thing to have the boots finished when you make the breeches). The hem is usually decorated with one or two rows of matching ribbon loops, the sides can remain plain or, as in this case, be decorated with braid.
Following the gaze upwards, naturally the next thing to sew is a shirt with a large, lace-framed collar and lace cuffs. The basic pattern of a baroque shirt is a rectangle with sleeve-rectangles attached and gathered into cuffs, the neck opening with slit lined with the collar that can be closed either with a button or, better, with two strings that end in a tassle. If you got too much time, you can embroider the shirt. I didn't have that time... :P
A doublet goes over the shirt, as a man just in his shirtsleeves was considered practically naked. The eight parts of the pattern are each lined individually and then sewn together. The long sleeves are slit, so the shirtsleeves of fine, white linen are visible. The striped pattern of the fabric I used just begged to be used for a zig-zag-pattern, which gives the costume additional decoration. Nonetheless (it's baroque, after all - they used tonnes of decoration unless they were puritans!) the parts are edged with matching braid and close at the front by means of tarnished brass buttons.
And the hat. Well, to my disappointment I discovered that what I bought is synthetic felt (I wanted real one, but try to get real felt by the metre...), which refuses to be molded in shape with a steam iron, so I had to change my plan and sew the hat - which usually is only done if it's a leather hat, I think, but anyway... The crown consists of two layers fused with an iron-on interfacing and is sewn to the brim (which also consists of two layers with still more interfacing between - just add enough to make it nice and stiff) and rimmed with wire. I zig-zagged it to the edge, but be careful, needles break easily if they hit the wire :P

The wire and zig-zag-stitch are covered by a length of ribbon in a matching colour (in this case the same as the hatband). The whole procedure makes it easier to get the brim in proper shape. I also added a sweatband on the inside and decorated the hat with a hatband and plumes. Et voilá, I've found a new hobby (again) :D

Add gloves and insert a handsome guy, and you got a perfect musketeer! ;)

Unfortunately my camera refused to depict the exact colour of the fabric. The brocade for the doublet is a rich golden colour, the linen for the trousers a warm, dark brown with a tinge of gold to it.
Well, the first thing to begin with are always the boots, right? No? Anyway... As there's no time to go for real boots, I decided to make fake ones, means boot-legs that are worn over over normal shoes (in this case 18th century low shoes that fit nicely). A double layer of fake suede (the slightly stiffened version) works quite well, the top is adorned with a row of lace that's stitched invisibly to the inside layer. The instep where bootleg and actual shoe meet is covered by this butterfly-shaped leather thingy that's so typical for this kind of boots, and a stirrup in a matching colour keeps the whole thing in place. The work of one evening, and it's done very neatly.
Next step are the trousers, loose breeches in this case that end shortly below the knee, just above where the boots start (so it's actually a good thing to have the boots finished when you make the breeches). The hem is usually decorated with one or two rows of matching ribbon loops, the sides can remain plain or, as in this case, be decorated with braid.
Following the gaze upwards, naturally the next thing to sew is a shirt with a large, lace-framed collar and lace cuffs. The basic pattern of a baroque shirt is a rectangle with sleeve-rectangles attached and gathered into cuffs, the neck opening with slit lined with the collar that can be closed either with a button or, better, with two strings that end in a tassle. If you got too much time, you can embroider the shirt. I didn't have that time... :P
A doublet goes over the shirt, as a man just in his shirtsleeves was considered practically naked. The eight parts of the pattern are each lined individually and then sewn together. The long sleeves are slit, so the shirtsleeves of fine, white linen are visible. The striped pattern of the fabric I used just begged to be used for a zig-zag-pattern, which gives the costume additional decoration. Nonetheless (it's baroque, after all - they used tonnes of decoration unless they were puritans!) the parts are edged with matching braid and close at the front by means of tarnished brass buttons.
And the hat. Well, to my disappointment I discovered that what I bought is synthetic felt (I wanted real one, but try to get real felt by the metre...), which refuses to be molded in shape with a steam iron, so I had to change my plan and sew the hat - which usually is only done if it's a leather hat, I think, but anyway... The crown consists of two layers fused with an iron-on interfacing and is sewn to the brim (which also consists of two layers with still more interfacing between - just add enough to make it nice and stiff) and rimmed with wire. I zig-zagged it to the edge, but be careful, needles break easily if they hit the wire :P

The wire and zig-zag-stitch are covered by a length of ribbon in a matching colour (in this case the same as the hatband). The whole procedure makes it easier to get the brim in proper shape. I also added a sweatband on the inside and decorated the hat with a hatband and plumes. Et voilá, I've found a new hobby (again) :D

Add gloves and insert a handsome guy, and you got a perfect musketeer! ;)
Red early-baroque dress


I'm incorrigible - yet another dress started while the previous ones aren't even finished! But time is pressing again, I need it for a play this time. Musketeer-setting, and that practically forces me to enrich my wardrobe by yet another dress. Baroque was still missing in my collection anyway :)

Main ingredient is rather thin, cherry-red cotton fabric, lined with slightly stronger red cotton. Red satin ribbon for the decoration, white cotton and white lace for the collar and the shirtcuffs. The white satin ribbon I used around the edge of the bodice is missing in this picture.
The pattern is from Holkeboer's "Patterns for Theatrical Costumes", the dress consists of a high-waisted bodice with large, lace-framed collar and a simple skirt.
The six parts of the bodice are lined individually and are then sewn together. The stomacher, stiffened by whatever you consider fit (if you use cardboard, make sure to add two or three pieces of steel boning at the back for additional stability), is attached to the bodice with hooks and eyes. Here's a detail of the front, already decorated with little wax pearls.

I stiffened the stomacher with two layers of stiff fusing material, one layer of double-sided fusing material and sandwiched invisibly in between three lengths of plastic boning, one centered, one on either side. The full sleeves end at the middle of the forearm, and of course also here we find the large lace collar and cuffs. White satin ribbon is sewn along the edge, and the front is decorated with little bowties, made from broad satin ribbon with a piece of narrow ribbon sewn round the center.

The skirt is self-explanatory, skirt with slit at the back, floor-length, maybe even a little longer (baroque opulence liked overlong dresses at the beginning of 17th century). It's worn without a farthingale, just with a few petticoats (or, in case of the pic, a very moderate hoopskirt). Here's a detail of the fastening:

Monday, 15 March 2010
Green regency drop-front dress


After some inspiration I sat down to make a quick regency dress from some material that had already been waiting for me to get motivated again. The inspiration was actually 1860s stuff, but regency was first in line on my to-do-list :) Again the pattern is from Janet Arnold's "Patterns of Fashion Vol. 1".

The fabric looks quite plain, still the more as the photo turned the green into some kind of pale mud-brown. Actually it's a tiny woven pattern of white and linden green which looks very nice once it's made into a dress.
I still don't know exactly how I managed to fit the pattern to my body, but somehow it worked even without a dress stand - thankfully! 1 1/2 days of sewing and an equal amount of time for the finishing touches, and now it's almost perfect (not completely satisfied with the sleeves, but anyway...). I didn't expect so much hand-sewing for the details of the bodice to be necessary, but it really paid off. Very clever pattern, the bodice gives a wonderful push-up effect and hence makes a very nice silhouette, and the dress itself does not only look good but also wears very well.

The front flap has three rows of tucks that I sewed with the sewing machine and afterwards overstitched them by hand. Thus the seams are very strong but still look period. The flap closes with hooks and eyes that are hidden by little mother-of-pearl buttons.

Beneath the flap is the gown's secret, the built-in push-up lining that closes with two hooks and eyes beneath the bust and over it with four buttons.


Subscribe to:
Posts (Atom)